Wednesday, October 21, 2009

Scrappy Ornaments Tutorial


Sew, Mama, Sew is having a tutorial contest on how to use up scraps, so obviously I had to join up. I was going to make a pillow back from scraps from the pillow top, but that's still not entirely ready. However I did notice my scrap bag wasn't exactly getting smaller, so I took the scraps from the pillow back, which were scraps from the pillow top, which were scraps from my scrap bag, most of which were scraps from an upholstery store down the street for this little project.

That's scraps to the fourth power! (Yes I'm a crafting nerd.)

First gather your materials:
scraps - scraps to the fourth power. For this I had a lot of greens, some blues and a few bright colors thrown in
backing material - this can be any size. The one used was a little over 10"x10".
Glue stick
Coordinating or contrasting thread
Ribbon (1/4" to 1/2" wide, approx. 1 1/2 yards for 9 ornaments)


Process:

Lay out your foundation piece with the right side facing DOWN. This will be the back of your ornament.

Then glue your fabric scraps to your backing piece. I used a sample upholstery square. I did this with my two-year old daughter. For hers I glues the entire backing before we started so she could just lay it down and grab another piece. For myself I glued sections of the backing to work on and sometimes just glued the back of the scrap piece before laying it on.
Pat each piece down as you go. Depending on how your backing piece looks you can leave parts bare like this on or cover the whole thing with scraps.

Eventually it will look like this:
Here's the two projects, one done by me, and the other by my two year old. Can you tell which one is which? This is part of what makes this a great kid's project. it's cheap, and the results are pretty much the same as adults that do it.
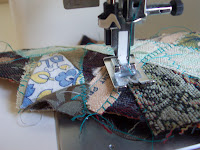


Next, sew down each piece to the backing. The glue stick will keep it mostly secure but won't dry in a way that will make it hard to sew. I sewed each edge of each piece, using a variety of stitches on my machine that my daughter helped me pick out. If you are sewing with a simple machine a zig zag stich ans a straight stitch will serve you well. (The eventual ravels of fabric edges add to the charm of it.)


Now even it off into a square or rectangle. For this one it was 10" by 10"

Then cut it into pieces for your ornament. I used somewhat wonky squares, more because I wasn't paying attnetion to my lines and I had a fabric scrap with a grommet in it right at the cutting line. For a 10"x10" square I cut 9 squares that were loosely 3 1/3". (It can be any shape really, think tree shapes, circles, stars...)


Cut 9 pieces of ribbon in 6" lengths. I used a brown satin ribbon under a light green lacy ribbon to bring out the bits of brown, tan and green in the squares.

Fold the ribbon in half and place it between the backing and a scrap piece. I used a corner so the ornament would look like a diamond.


Stitch the ribbon to the fabric as you stitch all around the edges. I would recommend an overcast stitch, satin stitch, or zig zag.


Embellish as desired. Add lettering, beads, embriodery, or whatever else you want to personalize the ornament. I'm planning on adding my daughters name and the year for true heirloom keepsake sentiment.


This is a fabulous craft for toddlers to do. The pictures here are of the one my two year old did! The only part you do completely alone is cutting the ornaments/ribbon, and the stitching. Even for that my two year old was sitting in my lap helping me choose stitches. (That ended promptly when she tried to feed the material through the machine. I saw her little fingers heading toward the needle and nearly had a heart attack!) But she picked her fabrics, helped glue them down, patted them to make sure they stayed, choose the thread and some of the stitches. Slightly older children could even be more involved in the sewing. I love that she chose some of the selvage edges, and they turned out so cute.

Wednesday, September 9, 2009

Steampunk Seat of Craftiness

I had a sad, sad little office chair, you know the kind, black industrial fabric, chrome and little rolly wheels. I've gotten very into steampunk and while I'm not technologically inclined enough to steampunk my computer, I did manage to do my office chair.

It involved a wine colored velvet shirt with burnout designs,a staple gun and several coats of antique gold acrylic paint.

THe middle of the shirt was smocked and just big enough to go around the rim of the chair seat. I tucked the rest of the shirt front into it to cover the seat and used the top back of the shirt as the back of the chair upholstery.

Then the seat looked fab but the chrome stuck out, so I dabbed on several layers of gold acrylic paint using a sponge brush and topped it with a coat of polyurethane. To finish it off I tied a bit of scrap fabric round the black adjustment knob in back and now I have a great victoriana/industrial chair for my craft room.

Friday, March 13, 2009

Mushroom Madness with Tutorial

This all started when I joined a poppet swap. What's a poppet? Well, technically it's any doll shaped thing, but on Craftster its a specific type of jointed doll as shown here.

The poppet is made from a recycle cashmere sweater and the hair is a variety of leftover variegated yarns. This particular poppet is a fairy and has purple wings attached at the back. Every fairy needs a place to hide her treasures. And since fairies are typically associated with fairy rings, aka a circle of mushrooms, I decided to make a mushroom container.


MUSHROOM TRINKET BOX TUTORIAL

Materials:

a yogurt container or other container with a plastic lid that can snap down
  • white felt
  • red felt (in this case I used recycled wool felted from a sweater
  • Buttons
  • Gold colored Embroidery thread
  • needle
  • glue (I used both tacky and spray adhesive)
  • glitter
  • scissors
  • cardboard
  • polyfill or other stuffing material
  • red ribbon 1/8 inch wide

Process:
After you eat the yogurt and clean out the container. Let it dry, then use the bottom of the container to trace a circle on the white felt. Cut it out.

Also cut out a rectangle of felt the height of the container and the circumference of the widest part of the container plus about 1/4 inch wiggle room for both measurements. Spray the rectangle with craft adhesive and wrap around the container. Snip the excess material up the side so it can be overlapped onto the container and laid flat.

Trim the bottom so its flush with container. Spray the circle of felt and place on bottom of container. Repeat for the inside. now you should have a felt covered yogurt container bottom that looks remarkably like the stem of a mushroom, and can be used to hold small items like earrings, hair accessories or spare change.

Now for the mushroom cap.


Cut out 3 more circles. First from the cardboard, about 1.5 inches larger than the yogurt cap and the second one of felt about 2 inches larger than the cap, the third one about 3 inches larger than the cap.

Use the spray adhesive to glue the smaller white felt circle down onto the cardboard. Snip the excess in to the edge of the cardboard and turn it over and glue around the cardboard. The thread the needle with a full 6 strand of embroidery floss. hold everything so the plastic lid of the yogurt container is centered ans sandwiched in between the felt covered side of the cardboard and a button (one with four holes not a shank type) Starting from the cardboard side poke a hole in the center of the cardboard through the plastic lid and through on of the button holes. Sew the button to the cardboard piece. Be sure to leave a few inches of floss at the back so you can knot the ends together once you are done. For good measure spray adhesive (or use other strong glue to secure the lid to the cardboard.

Now for the top of the cap. First decide on buttons, pick five that match. Use these as a guide and cut out circles of red felt 1/8 to 1/4 inch bigger than the button. Place one randomly on the white felt. Center the felt and button together, and sandwich the felt between the button and the white felt. Thread the needle with two or three strands of embroidery floss and sew on the button. Repeat with the other buttons until you have a nice spotted mushroom pattern on the large white felt. Using any stitch you desire sew the edge of the red felt to the white felt. I used a different stitch with each button. For ideas try a blanket stitch, cross stitch, even a running stitch can all look good.

Now thread the needle again with regular thread or one strand embroidery floss. Use a running stich along the edge of the large circle until you have gone all the way around. Gently pull the threads, gathering the circle until it is the same circumference as the cardboard circle.

Fluff out the gathers so they are even, then using a ladder stitch, sew the large white felt circle to the edge of the cardboard felt circle just catching the felt of the circle that is glued down. Leave a 1 inch opening for stuffing.

Stuff the mushroom cap until nice and fluffy, then sew closed.
Add red ribbon to the lip of the plastic lid. cover the button in glue and cover with red glitter if desired.


Let dry and you have your very own Mushroom Trinket Box.


It turned out to be the perfect size for my poppet (15 inches tall) to sit on or lean against. Since most of the poppet is head, it might work very well for 12 inch Barbie type fashion dolls in a fairy environment. If you make one I'd love to hear from you!

Tuesday, March 3, 2009

A Green Giveaway

Overat Pedals and Needles, they are giving away cute handmade products to help you go green including a shopping bag and bag holder. This is the perfect way to get prettified and do the planet a favor. Just leave a comment for your chance to win: http://pedalsandneedles.blogspot.com/2009/02/blog-give-away.html

I love this idea of a green giveaway and may have to outright steal this idea. Next time I make something green and prettified for myself perhaps i'll make two and offer one up to readers.

Wednesday, February 25, 2009

Hogwarts Goodness


I've been working on this awhile and finished my Ravenclaw scarf based on the pattern from atypically knit. It's the prisoner of Azkaban style. I used a vintage dusty blue wool blend and moonlight mohair in the silver color way. I got the mohair for $1.50 a skein (used 2)and the blue in a lot off ebay that I bought for all the other yarn in there. I used all 4.5 balls that came with the order.

Overall it cost about $8. It's 6 and half feet long with fringe and 9 inches wide (knit in the round so it's a double layer)

The mohair gives it a nice aura and a bit of glitz.


Here is closeup of the fringe, striping and initial in duplicate stitch.


This scarf took upward of 50 hours of knitting including the fringing. It was my first time doing color changes and my first time doing duplicate stitch. Overall the project was easy, but time consuming.


A while back I did a swap and made this wand (alongwith the turtle and DNA pendant) It's a harry potter style wand made from recycled paper.

I've joined a Harry Potter Swap on Craftster.org, so you will eventually see more hogwarts goodness.

Sunday, February 15, 2009

Recycled, Reused, Reduced

Recycled Gift bags

This week has been good for the environment. Most of what I've made has been with recycled or reused materials.

I bought an old wool sweater at a thrift store for 96 cents and felted it. I used it for craft projects before and had about half of it still sitting around on my craft desk so I made 4 gift bags.

The large one is made from the fronts of the cardigan. I left the pocket for added interest. The white ribbon down the sides is threaded through the button holes. The trick with reusing old clothing to make new things is utilizing whatever the garment gives you. The medium size bag is a sleeve with one end sewn up and a ribbon sewn on so I can be tied shut. I already used that one for valentine's day. The two little ones were made with the leftovers. One is a drawstring and the other has a flap that folds over. I had to embellish one corner with yarn because it had a small hole there.

Now I have durable, reusable gift bags suitable for many occasions.


Reusing old Valentines
My little Sprite came home with valentines on Friday so I took her valentines from this year and last year and made a place mat for her.

Placemat Materials:
cards/valentine themed stuff
plastic or cardstock cut to size of placemat
glue stick
packing tape


Process:
I laid the cards out on a piece of plastic (from a gift bag she also got) until they were arranged how I wanted them
Then I glued the back of each card to the plastic
Then I carefully laid down packing tape over the whole thing.
I did the same thing to the back side
Then trimmed the packing tape so it was just over the outside.


Reducing the Possibility of Loss
Then in preparation for the holidays (yes I'm starting early darnit or I'll never get any peace in the winter) I'm making my DH a gift certificate holder for his comic shop. They still give out paper gift certificates in plain envelopes, so I'm always afraid he'll lose it in the piles of paperwork on his desk. This should make it stand out. I used the same basic process for the envelope

Envelope Materials:
images from comics - I used pictures from the freebie preview newspaper the comic shop gives out
One envelope that I took apart
glue stick
packing tape


Process:
I laid the images out on the envelope until they were arranged how I wanted them - I love the skull, it's from a comic called apes and babes, which I know my DH does not read, but the graphic is awesome.
Then I glued the back of each comic to the envelope
Then I carefully laid down packing tape over the whole thing.
I did the same thing to the back side
Then trimmed the packing tape so it was just flush with the envelope.
I'm also planning on sewing on two buttons so It can be closed by winding string around them.

Sunday, February 8, 2009

My top thrift store finds

I love shopping thrift stores. It helps me feed my crafting addiction. Many of the things I've crafted recently are slated as gifts and haven't been received yet. I can't share them here until they are, so I thought I would put together a top list of things I love to find at thrift stores instead. These are the things I look for every time I go thrift store shopping.

  1. Other peoples crafts supplies - tools, fabrics, patterns, yarns and beads. Anything discarded by others because their stash got to big can add to mine. A dollar spent at the thrift store is about $5 at the fabric store so that equals big savings if I can find what I'm looking for.
  2. Great clothes that fit- I'm always on the look out for great clothes that actually fit. This is hard to find but when I do, oh the joy! My best find by far were a pair of Salvatore Ferragamo boots for $30 in a thrift store in San Fransisco.
  3. Clothes in great fabrics that are too big- Great fabric is great fabric and clothes that are too big allow me to tailor those clothes to make something that fits and is unique as well. I found this shirt recently for less than a dollar. It's got good front detailing. I'll need to take it in and re make the sleeves, but then it will be a great new work shirt! A gathered dress in a larger size can yield 3 or more yards of fabric to work with for any kind of project.
  4. Cashmere or wool sweaters- I felt these and then use them to make better fitting sweaters for myself if they are big enough, dolls and other soft toys, mittens, hats and any other small thing that would be good for wool if they aren't. For those doing cloth diapers, you can make them into great soakers. The picture is of a hat made from an angora sweater. (The sock was a simple recon for taking too tight socks and cutting off the cuff and re hemming to make more comfortable socks) I can pick up sweaters for 96 cents off season.
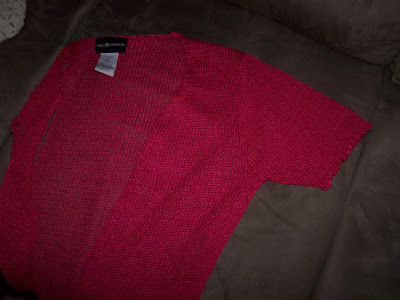
  5. Sweaters for recycled yarn- If you know what to look for you can dissect a sweater and reuse the yarn for your own projects. At the seam if the sweater it sewn with yarn and not serged together you take a seam ripper and carefully undo the sewn portions then unravel the sweater. This works great if you can convince your thrift store to give you the sweaters that are in such sad shape that they can't sell them. I got this one for 50 cents at a garage sale and will turn it into a cami adding some pink ribbon yarn for accents.
  6. Sheets - I can get plain flat sheets for $1 at the thrift store. Or a set for under $5. I have made pajamas, a 15th century style chemise, doll clothes, hand bags, reusable grocery bag, dresses, skirts, curtains and lots of other things from sheets. They are a great resource of woven fabric. Even if you don't sew they make ready curtains by just cutting at the very top to open up the large hem at both ends to slip a curtain rod through.
These are some of my favorite things to look for. What are yours?